Do-it-yourself or simply DIY projects are always fun and provide valuable learning experiences. Many of you may have tried your hand at some kind of DIY project, be it assembling bookcases, desks, chairs and shelves, setting up home audio systems, upgrading backyard landscaping or installing sprinklers and irrigation systems. Though the final product may not look professional, it certainly gives you a sense of accomplishment and satisfaction that is hard to describe. Along the way, you also acquire valuable skills that will help you to do things better the next time around. Over the years, I have attempted a few DIY projects, mainly assembling wooden furniture, painting, and backyard work, with some degree of success. Recently, I tried my hands at building an utility shelf from scratch and I wanted to share my experience and learning here.
The Opportunity during Stay-At-Home Restrictions
Our single family home has a two-car garage with plenty of shelves for storage. We had left the spandrel, under the staircase, open. (Spandrel is the space between the shoulders of adjoining arches and the ceiling or molding above).
We didn’t really have a need to add an extra shelf in the spandrel for storing any additional items, but I decided to do it as a DIY project, anyway.
At the beginning of 2020, stay-at-home restrictions due to COVID-19 pandemic, confined many families to their homes. Parents had the comfort of working from their home offices and children attended their classes online. Meeting and socializing with friends was a rarity. There was plenty of time available for watching movies, television shows, enjoying family games, improving culinary skills, gardening, or making home improvements. I used the stay-at-home opportunity to test out my carpentry skills. My motto was “trying something new is always fun and learning”!
Putting Carpentry Learnings to Good Use
During our college freshman year, as part of workshop classes, we learnt carpentry. Making lap joints and dovetail joints in the carpentry workshop was fun and remains an interesting memory I cherish even today. Being skillful at carpentry is never a priority for an engineering student, but knowing the basics was an academic requirement during those days.
I considered putting those skills and memories to the test by attempting to build a utility wooden shelf for the spandrel space in our garage. For a novice, building a regular rectangular shelf itself could be challenging but, making a utility shelf for the spandrel could be onerous. After some serious thinking, I decided to take up the challenge since this DIY project was more for fun and learning!

Visualizing the Shelf and Drawing it on Paper!
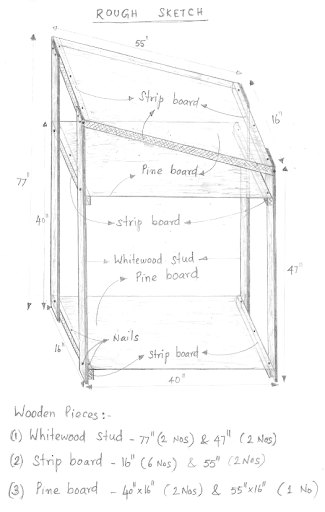
Prior to building the utility shelf, it was important to visualize how I wanted the shelf to look like. I drew a rough sketch of the shelf. I studiously measured the spandrel space and marked the measurements on the drawing. The sketch served as a guide for gathering the required wood and tools. It is good practice to visualize the end product and sketch it out as it helps one to work out the details of the build and prevent potential issues.
What do you need?
Materials
2 in. x 4 in. x 96 in. Whitewood Studs — very popular for building frames, houses, sheds and other structures. Usually comes from Tulip trees, and is relatively soft for making precise cuts.
1 in. x 2 in. x 8 ft. Strip Board — usually comes from pine trees and is ideal for a wide range of uses such as shelving, and general finish work. Helps create a level surface for attaching pine boards and panelling.
1 in. x 16 in. x 12 ft. Pine Board — paint grade panel ideal for shelving and woodwork projects
Tools
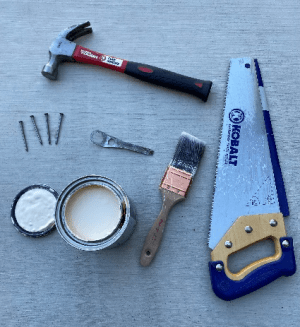
Hand saw
Hammer
Nails
White paint (semi-gloss)
Paint brush

Building the Shelf
I decided to use the garage as my workplace for this DIY project. I gathered the required wood and tools. Using the rough sketch as a guide, I cut the wood into required sizes with a handsaw. Cutting the wood precisely into the required dimensions was a major challenge. I assembled the frame first making sure that the whitewood stud and the strip board pieces were nailed nice and tight. Then I nailed the pine boards to the frame. At this point the shelf was completely built, and so I stood it on the floor. Although, the utility shelf didn’t look “professionally made”, it definitely looked satisfying for a “greenhorn carpenter”. The shelf certainly needed some painting to render it pleasing to the eyes.
My teenage daughters painted the shelf with semi-gloss white paint. It was their first time painting furniture, and it was enjoyable watching them paint. My girls did an awesome job and applied two coats of semi-gloss paint to the shelf. The utility shelf looked much better once it was painted.


Finally, fitting the Shelf in the Spandrel!
I was anxious to check if the utility shelf would fit well in the spandrel. Typically, with a DIY project, there is always the possibility of something going wrong, especially when someone tries their hand at a DIY build, for the first time. Many a time I have assembled furniture, then disassembled the same , realizing that something wasn’t right and then reassembled it yet again in the right manner.
This is how I realized the real value of visualizing and putting things on paper. The rough sketch served as a perfect guide and ensured that the shelf conformed to the measurements of the spandrel.
When we placed the utility shelf in the spandrel it fitted nicely in the space! The shelf looked really good for a first attempt. We are able to stack more items on the utility shelf.
What were the Challenges we faced?
Obviously, as a “greenhorn carpenter”, I faced some challenges, but I would like to share a couple of major ones here. The first and foremost was cutting the wood precisely into the required dimensions using a hand saw. Using the hand saw was not easy but wasn’t too difficult either. As an after-thought, I would have handled the hand saw better if I had practiced the cutting on some scrap wood prior to our DIY project. The last and final challenge was to keep the frame in the correct shape so that the utility shelf is not shaky when we stood it up. To ensure stability, I accurately marked with a pencil where the strip boards should be nailed on the whitewood studs. This activity made it easier for me to nail strip boards in their correct places and ensured stability of the utility shelf.
Do-it-Your(shelf) was a good learning experience and our family enjoyed it thoroughly!


